Thursday, December 12, 2013

Sindie POP! Lacquer: Swatch and Review

Hello friends! Today I would like to take a few minutes to tell you all about an indie polish line called "Sindie POP!" These polishes were purchased by me, swatched by me, and opinions are my own.

First I would like talk about these bottles! So cute! The only indie polishes that I own with these types of bottles! I love them! The brushes were normal (not wide) which I normally wouldn't prefer with most glitter polishes but it didn't make any difference with application.

Also before we get started I would like to say that all of her polishes are 3 free, meaning there is no Formaldehyde, DBP, or Toluene in the ingredients used to make them.

First up is called "Kiss Me By The Fireplace"
 
 
I was way too excited to get this one on when it came in the mail!! Its a dusty light lavender crelly base, and in my opinion it has a purple shimmer in certain lighting. The glitter is a royal
purple and red in a variety of sizes. There are also super tiny holo glitters in there too! I love it so much! It was perfect in two easy coats! To smooth it out I used two coats of base cost (yes, base coat) and one coat of Out The Door top coat. It was a sad day when I had to take it off, but not for long....
 
Because that meant it was time to use "Sky Sparkle"
 
OH MY GOODNESS YALL!!! Please tell me you all agree that this is heaven in a bottle right here.
This beauty has a milky blue crelly base, the glitters are blue, purple, white/silver, and it also has a little bit of holo dust in there too! Not as much as in the first, but it's there and it speaks to me! This was also two easy coats with two coats of base coat on top, and then Out The Door topcoat again.
 
The only thing that I didn't like about these is that now I need them all!! Seriously. Check out Jessica's Website to order and check out her instagram page @sindiepoplacquer! You will not be disappointed, I can promise you that. 


Wednesday, December 4, 2013

My Birthday Mani

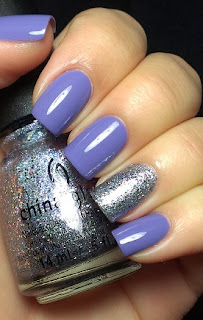
So today is a very special day for me! It's my 21st birthday! I really wanted a special mani for my big day but with work and the holidays approaching I haven't had as much time to do anything special with my nails so I decided to dig into my untried polishes. I probably have about 40-50 untried polishes! I need to get to work on those soon, but it's so easy to forget about them and lean towards others that are tried and true. So today I just decided I would find something in that stash to rock for this special day!
 
If you follow me on instagram then you know I have a serious weakness for my purples! I don't know what it is about purple but I just love the color in general and I love it on my nails! I've had these polishes for a few weeks now and I was just waiting for the right time to use them and it just happened to be today!
The solid purple is BONGO brand which is a fairly new brand to me and can be found at kmart. This color is called "#1 Stunner" and its amazing. I hate when I neglect a polish for so long and then just fall in love with it and I'm just like "Why?!?!? Why did I wait so long!!?!" this polish has a perfect formula. It covered the nail almost completely in one coat but was perfect at 2 coats.
 
 
The black cap makes the bottle so pretty and it does have gripes on it to make it easier to hold, but you can also take the black shell cap off for a regular sized brush handle.
 
 
Now, for that glitter!!! It happens to be China Glaze "Prism". I am a huge China Glaze fan, and this did not disappoint. At my local Sally's Beauty Supply they have a few similar to this which is a blue and a pink shade. I probably would have gotten the other two but they were so similar that it really seemed unnecessary for me, but of course I had to get the purple tinted one!!
 
 
There is a variety of glitter in this one, from what I can see are small hex glitters ranging from silver, blue, red, pink, green, yellow and orange and also super small silver and purple shimmers. Application was perfect and this is a full coverage glitter. after 2 coats I was good to go. I wouldn't at all recommend using this as a glitter topper because I feel like it would probably cover up most of the underlying color because of how well it covers.
 
I topped everything off with my usual Out The Door topcoat and I did use two coats over the glitter to give it a more smooth look. I hope you all have a great day and thanks for taking time out to read this post!
 
Happy Polishing!
-Brittney


Saturday, November 30, 2013

Easy Chevron Print Nails with Nail Vinyls

Today I would like to take a minute to tell you all about an amazing nail art find! Easy chevron print nails!! I am so impressed with these nail vinyls made by Lisa (@teismom on instagram) they are any nail girls best friend. I followed the simple instructions on the paper that came with the nail vinyls and took the helpful hint of using tweezers not for placing them but for removing them. I would recommend these to anyone that loves nail art and doesn't have the time, patience, or a steady enough hand to do it on their own!

 
This is the 100 count sheet I purchased for $3.00 on Lisa's Nail Vinyls site. I was too excited when I found out they were being shipped to me from High Point, NC. For one because I knew that would be sooner for me to get my hands on them! Secondly because that's about 30 minutes down the road from where I live!! That's the closest of any other nail girls I've met on instagram.
 
 
So I started my mani just like I would usually, and let my nails dry completely. If you have ever used stripping tape then you know all the horrible things that can happen with any type of tape and nails when they aren't fully dry!
 
After they were done drying I started with my tape!!

See! I told you it was easy! I made sure to push the tape all the way down on the edges as well as at the cuticle to make sure my second color wouldn't run under the tape. BEFORE the polish dried I immediately pulled the tape off one by one with tweezers.
 
 
Then I added top coat after it dried for a minute so that I wouldn't smudge my lines! And there you have it! A quick and easy mani, and not to mention it looks incredibly cute and professional!
I will definitely be repurchasing in the future and I will also have to check out some of her other vinyls that are available in her shop!
 
 
Color's used in this mani are as follows:
China Glaze- Coconut Kisses (purple)
Pure Ice- Beware (silver glitter)
Pure Ice- Private Show (black glitter)
 
Thanks for reading and happy polishing!!
-Brittney

Friday, November 29, 2013

Hello, I'm New Here.

Okay, so I have decideded that I would like to start blogging about my life in polish land. I wasn't sure what I wanted the first post to be about or how I wanted to introduce myself into the wold of blogging. So after a little thought I decided I would talk about my go to products for every manicure.

***All photos in this post were taken from google***

So I will just go in order of how I would do any manicure. For starters I do not use pure acetone for nail polish removal, I usually grab my stores brand of the pink non acetone polish remover because most of them say they are enriched with protein and vitamins. I don't like using pure acetne for removal because it dries my cuticles out.

If I have on a glitter polish I use the aluminum foil removal method which I will show at a later date with a pictorial.

To prepare for a fresh mani I always file my nails to smooth the edges out, occasionally Ill give them a little buff, and at least once or twice a week I do my cuticles. In my opinion (based off of personal experience) doing my cuticles once a week helps them stay maintained. Even if they don't look to bad I always do them just to keep them in order. I feel like most people go wrong buy waiting until they look bad until they do something about it when really they should always make it a priority and you will not have to deal with unruly cuticles. I use either Sally Hansen Cuticle Remover or Essie Disappearing Trick to soften and remove my cuticles. I like these products, but like I said I don't really have problem cuticles so I cant say that these are miracle products, though I do feel that with repeated use at least once a week and you would begin to see good results with these products and maintain healthy cuticles.


Okay! So lets keep this going. First I use Nail Life Nail Revitalizer as a strengthener and a base coat. There are two different formulas of this product, I use the original formula. I am completely in love with this product. I could immediately tell a difference when I started using this strengthener. At first it made my nails mostly harder just while wearing it, but after about 2 weeks I could tell an extreme difference with or with out it on. One thing I would recommend with this is to make sure this is pretty dry before you move on to the next step and start painting your nails. I noticed that if it's not completely dry it makes your polish apply weird and not very smooth.


Next up! after applying my nail color I use Out The Door top coat by INM. It is my favorite top coat ever. Its quick drying, and I rarely get shrinkage like some other fast drying top coats. If I have a chunky glitter polish (most of the time) I may use two to three coats of top coat just to get everything smoothed out and I make sure to let each coat dry a little in between. 


Okay so every nail polished obsessed person knows the importance of the clean up brush! Clean up is such an important detail in every mani. Its what pulls everything together and makes it look nice and clean. For clean up I use an Elf cosmetic concealer brush and pure acetone. I like the elf brushes because they are cheap ($1 at most stores) and they work perfect! I would advise that you clean your brush with soap and warm water shortly after use so that you get more then one use out of it before the acetone splits all the bristles and stiffens the brush up. Even though they're only a dollar, when you paint your nails nearly every day that could get expensive if you only get one use out of it!


So after I am done cleaning up usually my nails are pretty dry, I like to apply Beauty Secrets Cuticle Oil. I love the smell of this oil, and that it comes with a brush for application so you aren't paranoid about messing up your fresh mani! I just put it on all the edges of my nails and under the nail too! Then just sit back and relax, and let it soak in!


That's it! I do use a lot of other nail products through out the day which I will talk about at a later time, but these are my go to products for every manicure I do. I hope you all enjoyed this blog post and I look forward to doing more in the future! I would love any feedback so let me know what you guys think and what you would like to see in future posts. 
 
 
Happy Polishing!
-Brittney