Wednesday, September 24, 2014

A Halloween in the Park: Polish TBH and Sweet Heart Polish (Duo)

L: Not So Scary Halloween- Polish TBH
R: Mickey's Sweet Treat- Sweet Heart Polish

First up lets talk a little about "Not So Scary Halloween" by Polish TBH. This is a black jelly polish jam packed with glitter! The glitter shape varies from small hex to larger ones, squares, and even Micky is in there!! It has orange, green, and holo glitters that just shine through the jelly! It only took 2 coats and it went on smoothly with no need for glitter placement or fishing. First picture is with two coats of gelous topcoat and second picture is matted.


I love this shiny and matte but my favorite is the matte version. I will definitely wear this again closer to Halloween! It's so appropriate! 


Now lets talk a about "Micky's Sweet Treat" by Sweet Heart Polish. This is too fun! I used ONE coat with very minimal glitter placement. I love the way it looks over the black because the colors just pop! There are orange, a lighter orange, yellow, and white glitters packed in here. I love the variety of glitter shapes in this one too, it has circles, hexs, triangles, stars, squares, and Micky's in here too! 


Overall i was very impressed with this duo! Both polishes were unique to anything else in my collection and I will definitely be bringing them back out next month for Halloween!! I'm not sure who's shop will be selling these but check out both on instagram for updates and availability! @polishtbh @sweet_heart_polish

Friday, March 14, 2014

Daily Hues Nail Lacquer Swatch and Review

Hi Ladies!!

Today I have a nice short post about a new-ish indie brand Daily Hues Nail Lacquer. Jenn is the owner and creator and has also become a very close nail buddy of mine. I love her and her pretty polishes to bits! I only have 2 swatches for you today but I own many of her other polishes as well and I jumped at the opportunity to swatch for her! I love her polishes, my favorite are her holos! The formula is just to die for. I can not think of any other words to describe it you would have to just own some to see what I mean! Let's get started shall we??

First up is "Devlan"
 
This is 3 coats of absolute perfection plus top coat. You cant tell as well as I would like from my swatch but this is a silver holo with purple shimmer flakies all in it! I also noticed that at different angels it also took on a gold tone. Very unique to anything else I have in my collection. I really loved this little lady so much I need a full size! Haha.
 
Secondly is "Isla"
 
 
This was 2 easy coats plus one coat top coat! Super easy to apply, and even glitter coverage. This is borderline blue but I would call it more gray and there are a varity of small glitters in it. I love crellys so its no shock that I like this so much! I love the combination of the crelly color and glitter colors they complement each other really well.
 
*******I did not pay for these products but this is my honest review*******
 
Yall please go check Jenn out her ig is @dailyhuesnaillacquer and you can visit her store at dailyhuesnaillacquer.storenvy.com


Thursday, January 23, 2014

Krafty Gurl Nail Dazzel: Glitz and Glam

Today I am super excited to talk about my favorite indie nail polish brand, Krafty Gurl, and their new collection! The polishes I have today are from their anniversary collection it is called "Glitz and Glam" and is inspired by the roaring 20s! Lets just get straight to business..

First up we have "The Cat's Meow"

 
The best way to describe this would be to say it is a creamy black packed with gold shimmer! Its a stunner for sure! I didn't use top coat for this swatch because I really enjoy the finish on this one alone! Its seriously gorgeous!
 
 
Next up we have "The Ritz"
 

For this swatch I just used one coat over "The Cats Meow". It's a super glitter bomb mix of various sized silver and gold hexes. Its so sparkly! I can see myself wearing this one a lot! You just cant go wrong with silver and gold and I don't have anything like this in my collection!

Last but not least we have "Hotsy Totsy"

 
This beauty is a yellow gold. A little on the sheer side but well worth the extra coat or two.  I love how shimmery this one is! Again I did not use top coat as I liked the way it looked on its own. On my ring finger I have "The Ritz" again but in 3 coats on its own.
 
Overall I really love how glamorous all of these are! If I had to pick a favorite I would have to say "The Ritz" takes the cake because for one its glitter and for two it can really go with anything!
 
I hope you all enjoied this post and hop on over to their shop http://www.etsy.com/shop/KraftyGurlDesigns ang pre-order this entire collection for only $15 plus shipping!


Friday, January 10, 2014

Polish TBH: The Meraki Collection

Hi Everyone! It's been too long! I've been super busy with work and life outside of the polish world so I have been neglecting the blog lately, but today I'm back with some swatches for you from Polish TBH new Meraki Collection which will be available for pre-orders on 1/11/14. And trust me, you're going to want to pre-order!

I was given three of the six polishes to swatch and review for you all and I'm so excited to share!

First I would like to start by saying I love the theme of this collection. Meraki is a Greek word meaning to do something with soul, creativity, or love. I love that! Each of the polishes also have a meaning behind the names of them and I will tell you all about that as we come to them. So, we shall begin..

First up is "Hera"

 
Hera is the goddess of marriage. This is a glitter topper consisting of various shapes and sizes of silver and blue glitters and white and silver holo snowflakes and as if that isn't enough to make this beauty pop there is also blue micro shimmer. This was such a gorgeous polish and so difficult to photograph! This is one coat over a light sky blue. The snow flakes did require a little fishing which I didn't mind at all and it wasn't too much trouble because of the wide flat brush (which are my favorite!). I like that they are more of an optional feature so that this polish can be used year round. also another reason I enjoy a little fishing is that you get to place the glitters where you want them instead of them coming out in clusters.
 
Next up is "Pathos"

Pathos is named after the greek god of passion. It is a red creme with blue pink and very fine dusting of gold micro shimmer. I really love this one! I usually am not a huge fan of red polishes, but this one really hit my sweet spot! This was two coats of perfection and my new go to red polish!

Next up is "Eros"
Eros was named after the mischievous god of love. It is a creamy purple with a red micro shimmer and gold glitter. As a love of all things purple this was my favorite of the collection! Its a real show stopper and extremely unique. This swatch is two coats and I was good to go!


I loved everything about all of these and I cant wait to see what you all think!
 
Please be sure to check out Polish TBH on instagram @polishtbh and check out her store too http://polishtbh.bigcartel.com/


Thursday, December 12, 2013

Sindie POP! Lacquer: Swatch and Review

Hello friends! Today I would like to take a few minutes to tell you all about an indie polish line called "Sindie POP!" These polishes were purchased by me, swatched by me, and opinions are my own.

First I would like talk about these bottles! So cute! The only indie polishes that I own with these types of bottles! I love them! The brushes were normal (not wide) which I normally wouldn't prefer with most glitter polishes but it didn't make any difference with application.

Also before we get started I would like to say that all of her polishes are 3 free, meaning there is no Formaldehyde, DBP, or Toluene in the ingredients used to make them.

First up is called "Kiss Me By The Fireplace"
 
 
I was way too excited to get this one on when it came in the mail!! Its a dusty light lavender crelly base, and in my opinion it has a purple shimmer in certain lighting. The glitter is a royal
purple and red in a variety of sizes. There are also super tiny holo glitters in there too! I love it so much! It was perfect in two easy coats! To smooth it out I used two coats of base cost (yes, base coat) and one coat of Out The Door top coat. It was a sad day when I had to take it off, but not for long....
 
Because that meant it was time to use "Sky Sparkle"
 
OH MY GOODNESS YALL!!! Please tell me you all agree that this is heaven in a bottle right here.
This beauty has a milky blue crelly base, the glitters are blue, purple, white/silver, and it also has a little bit of holo dust in there too! Not as much as in the first, but it's there and it speaks to me! This was also two easy coats with two coats of base coat on top, and then Out The Door topcoat again.
 
The only thing that I didn't like about these is that now I need them all!! Seriously. Check out Jessica's Website to order and check out her instagram page @sindiepoplacquer! You will not be disappointed, I can promise you that. 


Wednesday, December 4, 2013

My Birthday Mani

So today is a very special day for me! It's my 21st birthday! I really wanted a special mani for my big day but with work and the holidays approaching I haven't had as much time to do anything special with my nails so I decided to dig into my untried polishes. I probably have about 40-50 untried polishes! I need to get to work on those soon, but it's so easy to forget about them and lean towards others that are tried and true. So today I just decided I would find something in that stash to rock for this special day!
 
If you follow me on instagram then you know I have a serious weakness for my purples! I don't know what it is about purple but I just love the color in general and I love it on my nails! I've had these polishes for a few weeks now and I was just waiting for the right time to use them and it just happened to be today!
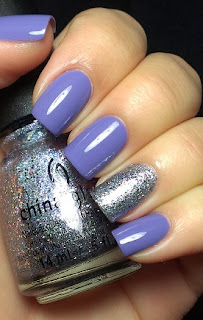
The solid purple is BONGO brand which is a fairly new brand to me and can be found at kmart. This color is called "#1 Stunner" and its amazing. I hate when I neglect a polish for so long and then just fall in love with it and I'm just like "Why?!?!? Why did I wait so long!!?!" this polish has a perfect formula. It covered the nail almost completely in one coat but was perfect at 2 coats.
 
 
The black cap makes the bottle so pretty and it does have gripes on it to make it easier to hold, but you can also take the black shell cap off for a regular sized brush handle.
 
 
Now, for that glitter!!! It happens to be China Glaze "Prism". I am a huge China Glaze fan, and this did not disappoint. At my local Sally's Beauty Supply they have a few similar to this which is a blue and a pink shade. I probably would have gotten the other two but they were so similar that it really seemed unnecessary for me, but of course I had to get the purple tinted one!!
 
 
There is a variety of glitter in this one, from what I can see are small hex glitters ranging from silver, blue, red, pink, green, yellow and orange and also super small silver and purple shimmers. Application was perfect and this is a full coverage glitter. after 2 coats I was good to go. I wouldn't at all recommend using this as a glitter topper because I feel like it would probably cover up most of the underlying color because of how well it covers.
 
I topped everything off with my usual Out The Door topcoat and I did use two coats over the glitter to give it a more smooth look. I hope you all have a great day and thanks for taking time out to read this post!
 
Happy Polishing!
-Brittney


Saturday, November 30, 2013

Easy Chevron Print Nails with Nail Vinyls

Today I would like to take a minute to tell you all about an amazing nail art find! Easy chevron print nails!! I am so impressed with these nail vinyls made by Lisa (@teismom on instagram) they are any nail girls best friend. I followed the simple instructions on the paper that came with the nail vinyls and took the helpful hint of using tweezers not for placing them but for removing them. I would recommend these to anyone that loves nail art and doesn't have the time, patience, or a steady enough hand to do it on their own!

 
This is the 100 count sheet I purchased for $3.00 on Lisa's Nail Vinyls site. I was too excited when I found out they were being shipped to me from High Point, NC. For one because I knew that would be sooner for me to get my hands on them! Secondly because that's about 30 minutes down the road from where I live!! That's the closest of any other nail girls I've met on instagram.
 
 
So I started my mani just like I would usually, and let my nails dry completely. If you have ever used stripping tape then you know all the horrible things that can happen with any type of tape and nails when they aren't fully dry!
 
After they were done drying I started with my tape!!

See! I told you it was easy! I made sure to push the tape all the way down on the edges as well as at the cuticle to make sure my second color wouldn't run under the tape. BEFORE the polish dried I immediately pulled the tape off one by one with tweezers.
 
 
Then I added top coat after it dried for a minute so that I wouldn't smudge my lines! And there you have it! A quick and easy mani, and not to mention it looks incredibly cute and professional!
I will definitely be repurchasing in the future and I will also have to check out some of her other vinyls that are available in her shop!
 
 
Color's used in this mani are as follows:
China Glaze- Coconut Kisses (purple)
Pure Ice- Beware (silver glitter)
Pure Ice- Private Show (black glitter)
 
Thanks for reading and happy polishing!!
-Brittney